Layout 坐标系 在上一篇文章 中,主要介绍了 onMeasure 的执行过程,这篇文章接着介绍下一个主要节点,onLayout。通过这篇文章的学习,可以了解 onLayout 的工作过程,已经常用的方法。最后以 FrameLayout 的 onLayout 方法来说明一下怎么自定义 onLayout 方法。
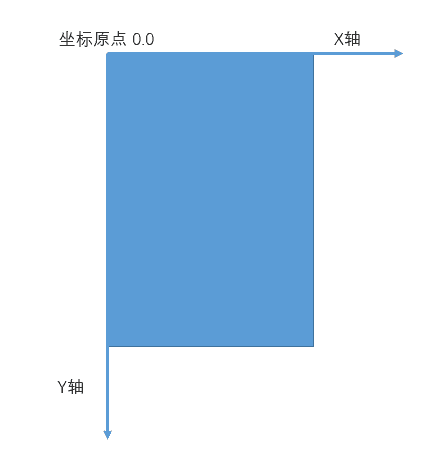
Layout 要完成的工作主要是将 View 放置到合适的位置上去,那么怎么来定义位置呢?在初中数学的时候,我们都学过笛卡尔坐标系,通过 (x,y) 的形式可以定义一个在二维空间的一个点。
常用的手机屏幕也是二维系的,Android 系统也是通过同样的坐标系来进行定位的,不过与笛卡尔坐标系不同的时候,y 轴的方向是相反的。其实,这也很好理解,Android 手机是往上滑动,内容是从底部慢慢慢慢出现的,将左上角定位成原点,也很自然而然。下面这张图,说明了 Android 手机中的坐标系是怎样的。
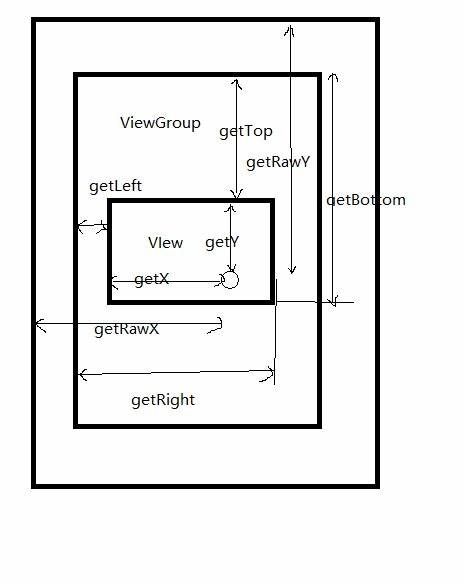
View 和位置相关的常用方法 开发过程中,我们常用到一些诸如 getTop 的方法,这一小节简单地介绍这些方法,说明他们真正的含义。这里需要补充说明的是,这些方法设计到的单位都是 Pixel,不是 dip 哦。
方法名
含义
getTop
view左上角与父view之间的距离
getBottom
子View右下角距父View顶部的距离
getLeft
子View左上角距父View左侧的距离
getRight
子View右下角距父View左侧的距离
下面的图例也说明了这一点。
那么我们偶尔用到的 scrollBy(x,y) 和 scrollTo(x,y) 中的 x 和 y 又是啥意思呢?这里的 (x,y) 是相对于父 View 而言的,还是屏幕的左上角呢?答案是前者,有兴趣的读者可以写一个小程序验证一下。scrollBy(x,y) 等价于 scrollTo(posX + x, posY + y)。
最后一种情况是,我们处理触摸时间的时候,通常会用到 MotionEvent, event 中的 getX 和 getY 方法这样可以知道触摸点的X,Y坐标。这里的 X 和 Y 分别是相对于父 View 而言的,如果想要获得相对于屏幕左上角的坐标可以用 getRawX 和 getRawY 来代替。
FrameLayout onLayout 解析 前文中,介绍了自定义 onMeasure 方法时,一定要调用 setMeasuredDimension, 对于 onLayout 方法而言,一定要对 view 调用 layout 方法,这样才能将 view 放置到合适的位置上去。layout 方法分别有四个参数,依次是 view 相对于 父view 的左边距,上边距,右边距,和下边距,可以理解为 9 点钟方向开始的顺时针 12 小时,哈哈,很形象吧。这里需要主要的是,右边距不是相对于父 view 的右边界,而是 view 的右边界相对于父 view 的左边界而言的,理解这个可以参考上一个图中所描述的 getRight 和 getBottom。
FrameLayout 的 onLayout 方法比较简单,这里直接通过注释的形式进行说明。
1
2
3
4
5
6
7
8
9
10
11
12
13
14
15
16
17
18
19
20
21
22
23
24
25
26
27
28
29
30
31
32
33
34
35
36
37
38
39
40
41
42
43
44
45
46
47
48
49
50
51
52
53
54
55
56
57
58
59
60
61
62
63
64
65
66
67
68
69
70
71
72
73
74
75
76
77
78
79
80
81
82
83
84
@Override protected void onLayout (boolean changed, int left, int top, int right, int bottom) layoutChildren(left, top, right, bottom, false ); } void layoutChildren (int left, int top, int right, int bottom, boolean forceLeftGravity) final int count = getChildCount(); final int parentLeft = getPaddingLeftWithForeground(); final int parentRight = right - left - getPaddingRightWithForeground(); final int parentTop = getPaddingTopWithForeground(); final int parentBottom = bottom - top - getPaddingBottomWithForeground(); for (int i = 0 ; i < count; i++) { final View child = getChildAt(i); if (child.getVisibility() != GONE) { final LayoutParams lp = (LayoutParams) child.getLayoutParams(); final int width = child.getMeasuredWidth(); final int height = child.getMeasuredHeight(); int childLeft; int childTop; int gravity = lp.gravity; if (gravity == -1 ) { gravity = DEFAULT_CHILD_GRAVITY; } final int layoutDirection = getLayoutDirection(); final int absoluteGravity = Gravity.getAbsoluteGravity(gravity, layoutDirection); final int verticalGravity = gravity & Gravity.VERTICAL_GRAVITY_MASK; switch (absoluteGravity & Gravity.HORIZONTAL_GRAVITY_MASK) { case Gravity.CENTER_HORIZONTAL: childLeft = parentLeft + (parentRight - parentLeft - width) / 2 + lp.leftMargin - lp.rightMargin; break ; case Gravity.RIGHT: if (!forceLeftGravity) { childLeft = parentRight - width - lp.rightMargin; break ; } case Gravity.LEFT: default : childLeft = parentLeft + lp.leftMargin; } switch (verticalGravity) { case Gravity.TOP: childTop = parentTop + lp.topMargin; break ; case Gravity.CENTER_VERTICAL: childTop = parentTop + (parentBottom - parentTop - height) / 2 + lp.topMargin - lp.bottomMargin; break ; case Gravity.BOTTOM: childTop = parentBottom - height - lp.bottomMargin; break ; default : childTop = parentTop + lp.topMargin; } child.layout(childLeft, childTop, childLeft + width, childTop + height); } } }
文档信息